Wednesday, 23 March 2011

Final Music Video


This is the final cut of our music video

. Holding a shot steady where appropriate - we do this several times when we shows the entire band playing and get the entire stage into the shot, the first five seconds of the music video is a good example of this, the long steady shot show's the band opening on a stage.

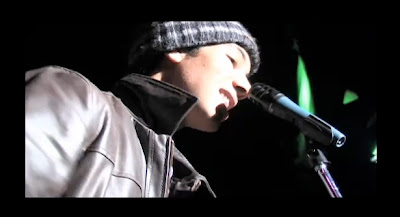
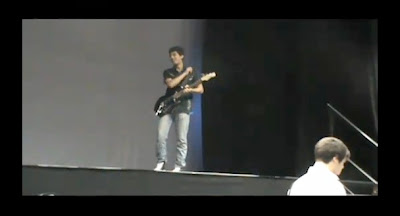
2. Framing a shot including and excluding elements - shot 1 below is well framed because it shows our singer performing his song excluding any other elements of the music video because that's what we wanted for this shot. Shot 2 which is also below shows us the band but at a earlier stage of the day where they are rehearsing as we can see that they are not dressed to perform and they are standing on and off the stage, this is what we wanted the shot to be framed like.

1


2

3. Using a variety of shot distances - we do have a variety of shot distances in our music video, for example at 0:01 we have a long shot, at 0:23 we have a close up on the guitars being played, at 0:32 we have a close up of the singer, there is a medium close up at 0:38, at 2:38 we have a extreme close up of the singer, we also have a medium shot at 1:05 of the drummer.

4. Shooting material appropriate to the task - I believe that the shooting material is apropriate for the music video, for example our genre is pop-rock and our performers are all dressed in the way that a real pop-rock band would dress. Also we have fast cuts to the beat which can also be associated with the pop-rock genre

5. Selecting mise en scene - I believe that the location which is the stage showing the live performance of the band is a good example of selecting the mise en scene, also our performers all wear similar types of clothes to fit the genre of the music video which also fits the genre of pop-rock.

6. Editing so that the videos meaning is apparent - an example of editing we have used to show the video's meaning would be the fast cuts to the beat in the video showing the bands performance.

7. Using varied shot transitions - we did not use any transitions because we believed that it was more appropriate for the video to use straight cuts. The transitions we believe would not of gone well with the video.

8. Using sound with images - we have used well put together lip syncing throughout the video every word should match with the song and singer. We have also used a lot of thought beats through the video which make the video more entertaining to watch. We have also used guitars and drums which we also believe we have matched up pretty well for the music and the instruments.

Wednesday, 16 March 2011

Friday, 4 February 2011

Evaluation Q3 - What have you learned from your audience feedback?

JW :Our feedback was generally positive about our video there were a lot of positive shots and techniques used which people liked. People liked the use of camera shots and angles we had in the video for example people mostly enjoyed the close up of the singer on an angle looking up.

RM: It was said by a few people that they thought the close ups of the singer were creative and enjoyable to watch; they also believed that these shots fit the genre of the music video.

JW: The viewers generally enjoyed the setting for this song a lot of people liked how the video was generally on the stage, they even enjoyed the clips showing the band messing around.

RM: The people generally enjoyed the lip-syncing and thought that we put the video together well especially the close ups which showed how the lip-syncing was done correctly.

JW: People who took time to comment on the video generally enjoyed the acting and performance of our band and the well put together editing of the video.

RM: Our audience also commented that they thought that the clothing and the look of the band fit the genre of the video quite well also we made sure that the members wore the same stuff which was prior for the video since it was shot on different days.

JW: It was also commented that the ending of the video where the band walk off was quite effective for the viewer as it made them feel like it was an good addition to make the music video seem more realistic like the original but not the original.

RM: There were also comments on that certain clips and shots may have been a bit too fast for the video and genre, and certain part’s of the video may have been out of sync on the first video however we have looked back at the video and fixed any mistakes that we may have over looked.

JW: The feedback telling us were we gone wrong is a vital part of making our video a good and enjoyable thing to watch so it is all constructive criticism. It was also commented that there could have been a few more locations used.

JW: However the original video by Fallout Boy just shows us the stage and a few behind the scenes shots through the video which is pretty similar to ours, we did not want to copy the video exactly but we wanted to keep it similar and adding different scenes that didn’t really make sense wouldn’t of worked in my opinion.

Evaluation Q4 - How did you use new media technologies in the construction and research, planning and evaluation stages?

RM During the early stages of this project we used Blogger.com to store all of our research and planning. Using Blogger gave us an easy and efficient way to store any of our important pieces of research or planning, as well as storing the drafts and the final designs for our digipak and any advertisements that we had created. We had used Blogger as a means of storing our work, as it is much easier than writing everything on paper and drawing all designs by hand.

JW It is also more effective then keeping everything on a single folder on the computer because it allows everybody in the group to gain access to the anything that we need provided that they have Internet access. Using Blogger also allowed us to embed videos from youtube to display publicly to anyone that came to the blog, these videos include actual music video that we had looked at for the purpose of research – studying the conventions used in the videos, the use of cinematography, mise en scene, etc – as well as our finished music video.

RM Photoshop was used during the construction of the ancillary tasks, such as the poster and digipak. They were made in Photoshop as it is an efficient and easy way to create images, and they can also be created in a format that can be uploaded to Blogger. Photoshop also allowed us to apply many different effects to any images that we had created, allowing us to make the digipak, poster, etc. more intricate and interesting to look at.

JW For the construction of the music video itself we used Final Cut Express. Using Final Cut was definitely an improvement over using iMovie. Final Cut was a little more complicate than iMovie to begin with but we quickly got used to how it worked and all of the features that it has over iMovie. Final cut provided us with an easy and simple way of syncing up the video to the audio effectively, if we were to do this in iMovie the process would have most likely been much longer and more frustrating to do.

RM In conclusion we that we have learned a lot from the new programs that we have used and it has broadened the range of programs that we can now use and has given us more experience overall in using new media technologies. We are also happy with how our final music video turned out but think that we could have made much improvement to it had we been given the time.

Friday, 21 January 2011

Final Digipak Cover

As you can see there are a few changes that have been made since our draft digipak. We have removed the photos of the band members as we thought that they felt out of place to the rest of the digipak. We have also added more songs to the track list and added a copyright notice on the back of the case. The title has also been added to the front and the spine of the digipak.

Thursday, 20 January 2011

Inside of Digipak

This is the inside of the Digipak case.

Wednesday, 19 January 2011

Tuesday, 18 January 2011

Break Down of Digipak Back –

The first step to creating our digipak for our band and music was to select and design a style for our pack. So after messing around with a few ideas we came across our design, which we all really liked and thought that it fit the music, quite well.

(This isthe design of our Digipak and first step)

The second step to creating our digipak back was to then add the songs of course. However we had to choose a fitting font for the names of our music. We also had to choose a colour that was visible and looked good on our custom made background. So we chose ‘Rockwell Extra Bold’. We added a good number of songs to the back of our digipak and also made it smaller so we could fit more on the back.

(This is an example of theRockwell Extra Bold writing on our custom made background and the second step to creating the back of our digipak)

The third and final step to create the back of our pack was to then add copy right information and add a bar code for our music video so it able to go through the checkout and scanned for shops of course. We used a logo and a statement for our song and music we also had to make sure it stood out from the rest of the music so we chose the same font but we turned it white.

(This is an example screen grab of our copy right information and bar code step three of the creation of the back of the digipak.)

Our finished product came out just how we expected it too; we liked the design, which we created and chose it to defiantly be on our digipak. The design came together with the three steps we took to create the perfect back of the digipak for ours.

(This is the finished product of the back of our digipak)

Friday, 7 January 2011

Draft Digipak

This is a draft of the Digipak that we are making for the band.